Saturday, December 15, 2012

Winter Travel

December 15th and time for another duel with the Dueling Darlings.   The DD's are a group of paper crafting gals composed of two teams, the Divas (my team) and the the Dazzlers.  Every month a member from each team consult one another, decide the theme for their hosting month and send out a card kit to each of their team members.  This month of December our hosts, Barb for the Diva's and Michelle for the Dazzlers, chose the theme "Winter Travel".  Here's the card I created from the awesome kit I received from Barb:

I used the following items from the kit:
 
Patterned papers: Little Yellow Bicycle's Winter Plaid/Mocha Java Sweater and Snowy Window/Ski Sweater
Stamped Image: Whipper Snapper's Downhill Snowman (Chase Snowflake sentiment on the inside)
Ink: image stamped with Momento Tuxedo Black, colored with Copic Markers (B00, BG09, BG10, E25, E29, C1, C5, YR19, YR68)
Ribbon: white satin snowflake
Brads: Silver, white colored with Copic Marker BG09
 
The base of the card is Stampin' Up cardstock in Early Espresso, as is the matting on some of the panels.  The white glitter paper panel was embossed with Cuttlebug snowflake embossing folder.  Stamped image was cut out and mounted with dimensionals and the ball on the end of the cap is has Frosted Lace Stickles as do the drops of snow.


Here is the inside:
 
The sentiment panel was punched with a Martha Stewart snowflake punch.  The small panel at the bottom was scalloped die cut, and the strip of patterned paper has a strip of chocolate brown ribbon from the kit.  Blue paper is from Bazzill.
 
I used this week's Mojo Monday sketch here:
 
In addition to the creating a card from the kit we were asked to tell a story related to "Winter Travel".
Today I live in the Arizona desert and the most severe winter travel might be in a rainstorm.  Most of my years I spent in NW Washington state.  Even there we don't always get a lot of snow but there was one memorable "Winter Travel" I made from Bellingham which is near the Canadian border to a town about 25 miles south of Seattle, a trip that was a little over 100 miles in one of the worst snowstorms I ever saw in NW Washington.  Sometimes I marvel that I made it home in one piece!  At times the snow was coming down so hard and wet that snowflakes were clumping together and hitting my windshield the size of baseballs!  One of the hairiest parts of the drive was crossing the Ship Canal bridge along I-5 that takes you from north Seattle into city central.  The snow was so deep on the bridge that the ruts were at least a foot deep and you had to get in one of the rut paths and just stay there.  This all happened the day after Christmas!
 
Please check out the Diva's creations here:
 
 
And the Dazzlers here:
April: http://aprilsalley.blogspot.com/
Darlene: http://accordingtobijou.blogspot.com/
Debbie: http://theinkigloo.blogspot.com/
Melina: http://me-craftyscrapper.blogspot.com/
Michelle: http://me-craftyscrapper.blogspot.com/
Paola: http://paola-sama.blogspot.com/
Terry: http://itstotallyterry.blogspot.com
 
Thanks for stopping by! 


Wednesday, November 14, 2012

Dueling Darlings: Planes, Trains and Automobiles

It's November 15th and time for another duel between the Dueling Darling Divas and Dazzlers. We're a group of papercrafting friends who all met on the Splitcoaststampers forum website.  Each month a Diva and a Dazzler get their heads together and come up with a theme and a kit filled with designer papers, stamped images and sentiments, and lots of embellishments that they send out to their respective team members.  For November the Divas' host Carol and the Dazzlers' host Debbie chose the theme Planes, Trains and Automobiles.  They said the reason that they chose this theme is that the movie of the same name is a story whose characters are trying to get home for Thanksgiving.  Also they thought this fitting as November is Aviation History month, National Model Railroad month and November 22nd is Go For A Ride day. Pretty clever, huh?  This month the Divas welcome our newest member, Kadie!  So very excited to have her joining the Divas with her awesome creativity and beautiful spirit! 

Carol's kit to me included 5 fantastic sheets of DSP mostly by Bo Bunny and Kaiser Craft and some great flash card from Graphic 45.  An antique flying machine image and some mini car images.  Also she included ribbbon, rickrack, buttons, and brads. 

Here's my card:

 
I used the flash cards from Graphic 45 for the 3 rectangle panels the narrow strip is from one of the DSP included in the packet.  I colored the mini cars with my copic and attached a silver flower brad from my own stash to the antenna of the car then mounted on the card with dimensionals.  I stacked a white button on top of the black button (both from the kit) and tied with some twine from my stash. I attached the button at one end of a row of black rickrack also from the kit.  I used SCS sketch SC411 as the layout as seen here:
 
As a bonus challenge Carol asked us to of a Thanksgiving memory or a memorable trip to get to your holiday destination.  When I was away at college I was so looking forward to going home for Thanksgiving and enjoying the  wonderful meal I knew my mom would have on the table.  So in preparation I almost starved myself for weeks so I could really make a pig of myself on Thanksgiving Day.  Well, that really backfired.  Rather than allowing myself to gorge on the feast, I found I had shrunk my stomach and couldn't even finish the first serving on my plate 'cause my stomach hurt so bad! And speaking of my mom, it will be 24 years ago this Thanksgiving that I spent my last day with her.  She died the very next morning.  A Thanksgiving never goes by that I don't remember mom and wish she was still with me.  I've learned over the years that it's not so much about the food but the loved ones we celebrate the day with that is the real blessing and one for which I always give thanks. 
I'm wishing you all a very blessed Thanksgiving!
 
Please check out the rest of the Divas creations:

Kelly: http://www.sandcastlestamper.blogspot.com/
Barb: http://inkingintoretirement.blogspot.com/
Carol: http://lostinmycraftroom.blogspot.com/
LJ: http://buckygirl.blogspot.com/
Tami: http://blueinksdesign.blogspot.com/

Next check out the Dueling Darling Dazzlers starting with their team leader
Jeanette http://creativeplayischeaperthantherapy.blogspot.com/
April: http://aprilsalley.blogspot.com/
Darlene: http://accordingtobijou.blogspot.com/
Debbie: http://theinkigloo.blogspot.com/
Melina: http://me-craftyscrapper.blogspot.com/
Michelle: http://me-craftyscrapper.blogspot.com/
Paola: http://paola-sama.blogspot.com/
Terry: http://itstotallyterry.blogspot.com/

I love to hear your comments. Thanks for stopping by!
 
I

Monday, November 5, 2012

Baby Times Two

Last week my BFF's daughter gave birth to twins.  First card I made for baby boy Jason:
 And here is a card for baby girl Natalie
 
Stamps by Hanna Stamps "B is for Baby"
Paper:  Cardstock Stampin' Up "Bashful Blue", " Pretty in Pink", "Daffodil Delight" and Bazzil
Designer Paper from Best Creation Inc "Sweet Baby"
Accessories:  Copic markers, Cuttlebug embossing folders, ribbon and stickles
 
I used this sketch from Freshly Made Sketches
 

Thursday, November 1, 2012

S.O.T.C. Mystery Swap Reveal!

Going on 4 years now a group of card making gals on Splitcoaststampers website have an monthly swap called the Sisterhood of the Traveling Cards.  We've gone through several transitions over the years.  Some of the sistahs have left and new ones have joined our group.  Each month one of the sistahs hosts the swap and decides the theme.  Our beloved Kadie who started and facilitates this swap is the host for September/October and she sent a little note to each sistah giving them their "mystery" theme.  Anybody want to take a guess as to my theme?  Here's a hint:

Inside:
FLUTTERBY!
Those of you who know me know that I love all things butterflies so it's not surprising that Kadie chose this theme for me.  The main image is from C.C. Designs for All That Scraps' Gingersnaps - Bugga-boo's.  My sweet Bugga-boo is colored with Copic markers with a dash of Stickles on her wings and is layered on top of black cardstock punched with Martha Stewart Butterfly Punch Around The Page punch.  The background layer is embossed with a Cuddlebug butterfly embossing folder.  The butterfly designer paper is from Graphic 45's Botanicabella Collection "Ode to a Butterfly".  The floral d.p. is from Basic Grey...sorry, can't remember the collection.  The inside has butterfly punched border from another Martha Stewart punch.

The layout is based on the sketch challenge for Splitcoaststampers this week.  Here's the sketch:
 
Thanks for stopping by!  I love to hear from you!!
Friday, October 19, 2012

October Anniversary and Birthdays

I've been busy lately making cards for birthdays and one for an anniversary.  First card is for my friend Ginger who celebrated earlier this month.  Here's her card:
Stamp: Stampin' Up "So Happy For You"
Paper: Stampin' Up cardstock and designer paper, "Patio Party"
Accessories: Martha Stewart 3 butterflies punch, lacy butterfly ribbon

 I used Splitcoaststamper sketch SC407 (http://www.splitcoaststampers.com/forums/card-sketches-f41/sketch-challenge-407-%7Boctober-17-2012%7D-t562728.html)

Here's the inside of the card:
 Stamp:  Gina K Designs "Inside and Out"
Paper:  Stampin' Up cardstock and designer paper "Patio Party"
Accessory: Martha Stewart butterfly punch around the page punch
 
 
The second birthday card is for my friend Patty.  Patty loves butterflies and Autumn colors as much as me so this was a fun card for me to make:
 Stamps: Stampin' Up "Papillon Potpourri", Gina K Designs "Friendship Blooms"
Paper:  Stampin' Up cardstock and Basic Grey designer paper "ambrosia/winsome"
Accessories: Cuttlebug embossing folders, Nestability dies,
 Stampin' Up punch "Elegant Butterfly", ribbon
 
I used mojomonday sketch 263 as seen here:
 
  
 On the inside of the card I used the M.S. butterfly punch and more of the designer paper.
 
 
Here's a birthday card I made for my super, wonderful, awesome, gracious and loving sister-in-law Tina:
 Stamp: Gina K Designs "Inside and Out"
Paper: Stampin' Up cardstock, designer vellum paper (retired), 
variety of designer papers (companies unknown)
Accessories: Nestability oval dies, Memory Box "Elegant Scrollwork" die, variety of prima flowers, gold embossing powder, versamark
 
I used Jen's the Deconstucted Sketch No.74 as my layout as seen here:


This is a card I made for our dear friends Joy and Rich's anniversary today. I decided to enter this in SCS Clean and Simple challenge CAS192 (http://www.splitcoaststampers.com/forums/clean-simple-cards-f239/cas192-theme-harvest-10-15-12-a-t562616.html) and SCS color challenge CC397 (http://www.splitcoaststampers.com/forums/color-combinations-f43/cc397-vanilla-chocolate-pie-10-16-12-a-t562684.html):
Stamps: Stampin' Up "Grand Cornucopia"; Stampabilities "Happy Anniversary"
Paper: Stampin' Up cardstock: Chocolate Chip, Pumpkin Pie, Very Vanilla
Accessories: Martha Stewart maple leaf punch, copic markers, ribbon 

Inside of the card is with a computer generated sentiment 

I think it takes me almost as much time to upload pictures and prepare this post as it does to create the cards!  Blessings!

Monday, October 15, 2012

A Dueling Darling Mystery???

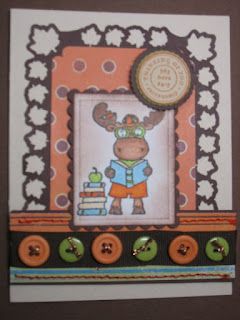
It's the 15th of the month and time for another duel between the Dueling Darling Divas and the Dueling Darling Dazzlers.  Since the Divas are minus one this month, Melina, of the Dazzlers, challenged us Divas to create a card with our team leader in mind.  So for the Diva's she asked we use the theme "Animals" because our Diva leader Kelly is such an animal lover and also to include buttons on our card 'cause buttons find their way on to Kelly's cards a lot.   So here's my card:
For my "animal" I chose Riley the Moose because I know Kelly really loves Riley.  In fact, she's on the design team for Riley.  Because we did not actually recieve a kit this month, I went into my stash of card kits I've received from past card kit swaps and found this one.  It was perfect for this swap as it include the theme with the buttons.  I did add the maple leaf punched layer in Stampin' Up's Chocolate Chip cardstock, The sentiment circle from SU's Circle of Friendship (retired) and layered with the punched circles in Chocolate Chip, Old Olive cardstock.  I did a little stitching on the striped d.p. piece and layered it with the Chocolate Chip ribbon that was in the kit and attached the buttons to the ribbon.  I chose to use this Splitcoaststampers sketch SC406 and tweeked it a little bit by turning it on it's side.  Here's the link: http://www.splitcoaststampers.com/forums/card-sketches-f41/sketch-challenge-406-%7B10-10-12%7D-t562391.html

The big surprise is Kelly doesn't know we're doing this in her honor until today.  Kelly is one of the most loving and generous people I know.  She is a faithful servant of her Lord and is always there to lend a hand, to lift someone up whether in word or deed.  She's also one super wonderful and devoted wife and mom.  Along with her super busy schedule she takes time to make some of the most beautiful cards you'll ever see.  I'm always thrilled when I receive one of her creations.  I can't think of anyone more deserving of recognition than our sweet KELLY!  LOVE YOU GIRL!!! Be sure to check your mail box for some happy mail soon!

Be sure and check out the rest of the Divas here:
Kelly: http://www.sandcastlestamper.blogspot.com/
Barb: http://inkingintoretirement.blogspot.com/
Carol: http://lostinmycraftroom.blogspot.com/
Jamie: http://butterflystamper71.blogspot.com/
LJ: http://buckygirl.blogspot.com/
Tami: http://blueinksdesign.blogspot.com/

Next check out the Dueling Darling Dazzlers starting with their team leader
Jeanette http://creativeplayischeaperthantherapy.blogspot.com/
April: http://aprilsalley.blogspot.com/
Darlene: http://accordingtobijou.blogspot.com/
Debbie: http://theinkigloo.blogspot.com/
Melina: http://me-craftyscrapper.blogspot.com/
Michelle: http://me-craftyscrapper.blogspot.com/
Paola: http://paola-sama.blogspot.com/
Terry: http://itstotallyterry.blogspot.com/

I love to hear your comments. Thanks for stopping by!

Saturday, September 29, 2012

Papercrafting with Friends!

Today my friend Fay hosted my friend Kadie and me at her home in Federal Way.  After a yummy lunch we spent some time papercrafting.  I was so pleased that Kadie who is a certified Copic instructor and who also has acquired Copic coloring skills way beyond her training took me up on my suggestion and gave us a hands on tutoring in coloring with our Copic markers. Here's the results:
Here's a close-up. 


 Fay and I had the opportunity to try a new techinique this summer at a Rubber Stamp and Scrapbook Expo in Puyallup, WA, using adhesive, extrafine glitter, stickers and copic markers.  I provided the supplies and here's our efforts:
 
We had a lot of fun visiting and crafting and eating a delish cheesecake topped with a huckleberry sauce created by Fay.  Our friend Paola who lives about 150 miles north of Federal Way was not able to join us so she surprised us with a call from her home in British Columbia, Canada.  Hopefully next summer we'll have another papercrafting get together with more of the SCS sistahs attending.

Tuesday, September 18, 2012

Crazy Quilt of Dueling Darling Kits

Its dueling time for the Dueling Darlings and I'm late!  In case you haven't already heard the D.D.s are a group of friends that met on Splitcoaststampers (SCS),  participated in each others card swaps, visited each others blogs and decided to take our papercrafting addiction to the next level by "dueling".  My group the Dueling Darling Divas "duel" it out with the Dueling Darling Dazzlers on the 15th of each month with each group using a different card kit with the same theme!  The purpose is to see what we come up with using this theme and the image that was picked and how the divas and dazzlers created with their respective kits.  We've been doing this now for 2 years.  Debbie, a Dazzler, came up with a unique and fun challenge this month to use the materials left over from the kits we've received over the last 8 months and create a card.  Here is my mine:


I took the challenge literally "to use something from every kit" I received. So in that spirit I used diagnonal rays of patterned paper taken from seven different card kits.  (I got the inspiration from Kristina Werner's video tutorial here: http://www.youtube.com/watch?v=jKO_Heae1ek ) Kind of creates a crazy quilt look don't you think?!!  The medallion, flower, button and twine were also taken from different kits as was the chocolate brown cardstock panel, white "dotted swiss" embossed panel and craft cardstock base.  The only thing that didn't come from one of the card kits was the adhesive to put the card together. : )

Check out the rest of my team Diva's creations here:

Kelly: http://www.sandcastlestamper.blogspot.com/
Barb:  http://inkingintoretirement.blogspot.com/
Carol: http://lostinmycraftroom.blogspot.com/
Jamie: http://butterflystamper71.blogspot.com/
LJ:      http://buckygirl.blogspot.com/
Tami:  http://blueinksdesign.blogspot.com/

Next check out the Dueling Darling Dazzlers starting with their team leader
Jeanette  http://creativeplayischeaperthantherapy.blogspot.com/
April:     http://aprilsalley.blogspot.com/
Darlene: http://accordingtobijou.blogspot.com/
Debbie:  http://theinkigloo.blogspot.com/
Melina:  http://me-craftyscrapper.blogspot.com/
Michelle: http://me-craftyscrapper.blogspot.com/
Paola:     http://paola-sama.blogspot.com/
Terry:     http://itstotallyterry.blogspot.com/

I love to hear your comments!  Thanks for stopping by!!


Saturday, September 1, 2012

Birthdays, Birthdays, and more Birthdays!!!


I've been busy making birthday cards for family members over the last couple weeks.  First birthday was for our niece Justine.  The card I created was inspired by a gorgeous dress my sister-in-law gave her.  Here are pix of the dress and card:
 This is a section of the dress that I used as inspiration for her birthday card
 
 This is the outside of the card.  Green cardstock was stamped with a leave image both in green and black.  The flower was made from a Stampin' Up stamp and punch with adhesive rhinestones and stickles added for the bling.  The white leaves are die cut from a Memory Box die.  Sorry I don't have the specific names with me right now.
 The inside of the card has the negative Memory Box leaf die to show the green layer underneath.
Do you think I captured the essence of the dress with this card???
By the way, our niece was thrilled with both the dress and the card!
 
 Five days later our nephew Michael celebrated his birthday and we were pleased to spend part of it with him.  Here's the outside of the card. Circles were made by stamping several Stampin' Up Circle Circus stamps with Versamark and embossing with silver embossing powder and punched out.  The waves die cuts were made with a Memory Box die
 And here's the inside of Michael's card.
 
 
 The card is for my sweet and very special cousin Linda.  She is such a blessing to my family and does so much for so many.  She'll be celebrating her birthday tomorrow, Sept 2nd.
 
Last and certainly not least is the birthday card for our son John who celebrates his birthday on Sept. 4th.  I really wanted to do something unique and special for my firstborn.
 This is a two-sided card.  One side was stamped with this Stampin' Up stamp with the balloon basket.  Attached is a die cut for the balloon with a shaker plastic with a variety of coins for the "shaker" part.  In the background are some cloud die cuts with a Memory Box die.
 The other side of the card features a pocket card.   
Here's the tag pulled out of the pocket.  Another pocket was attached to this.  On the tag pocket I stamped a Stampin' Up birthday sentiment (again I forget the name...sorry!) Inside this pocket is a check for the birthday boy! 
What do you think?  Was this a unique birthday card??
 
That's it for today! 


Sunday, August 19, 2012

Creating Glass Art!

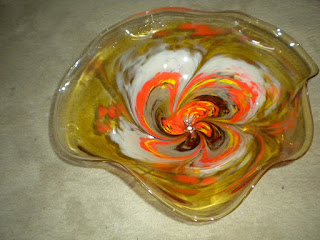
Yesterday my dear sister-in-law Justine treated me to a glass art experience where I got to make a piece of glass art with the help and guidance of an experienced glass artist.  What a wonderful experience and I have this beautiful piece of art glass to show for it.  Here are some pix  of the process:
 Here I'm selecting the color chips that will give my glass piece color and design
 The tray with the order of colors.  The darkest color shown here is a translucent amber when it's in the glass.
 This is my instructor, guide and glass blowing guru Billy showing me the first step with the molten glass which includes constant turning.
 Billy is guiding me here in picking up the colors on the tray and attaching to the glass.  This will occur several times between the glass going in the "glory hole" and picking up more molten glass.

  •  Here the glass is being rolled in a wooden form
     I'm blowing in the glass as Billy turns it
     Here's the finished design coming out of the "glory hole"
    

    Here's the glass before it's removed from the stick and a "foot" is placed on the bottem and placed in the oven for the cooling down process.

    24 hours later my finished piece!
    

    Tuesday, August 14, 2012

    Getting My Game On!

    It's the 15th of the month and time for another duel with the Dueling Darling Divas and The Dueling Darling Dazzlers.  I'm on team Divas and our intrepid and spirited leader Kelly sent the Divas this awesome kit with the theme "Are You Game?!" in celebration of National Scrabble Week.  Well, the challenge was to try something new and the theme didn't have to be about Scrabble just any kind of game using the elements in the kit.  Here's a rundown of the kit:
    Designer Papers
    1.  Kraft/black playing card DSP: Graphic 45 "All Decked Out" and "Bits and Pieces"
    2.  2 sided Yellow polka dot DSP:  Bo Bunny Vintage Buttercup
    3.  Red Chevron DSP:  Glitz in Town "Yours Truly Chevron"
    4.  The other yellow DSP:  My Mind's Eye "Nostalgia"
    5.  Red and white lace DSP:  Jenni Bowlin "Lacy Border"
    6.  Black and white DSP:  Jenni Bowlin "Deco Chain"

    Embellishments
    Kaisercraft Flourishes die cut wood pieces "Playing Cards" (mine was a spade)
    Buttons from Basic Grey and American Crafts
    Prima Flowers
    Martha Stewart Glitter backless brads, Kaiser bling
    Ribbons: black/white diamond check "Celebrate It", Yellow by PTI, Red and black from Offray

    We were challenged too use at least two of the DSP, at least one ribbon, your wooden charm, one bling and one button.  Here's the card I made in answer to the challenge:
    I love to play card games, board games and just about any kind of game so this was a fun challenge.
    I used both pieces of the Graphic 45 DSP.  I cut out the "playing cards" from one and arranged in a fan shape like a playing hand.  My wood "spade" die cut was arranged over one of the spades on the "card" front while I placed a black bling on top of the other spade.  The "heart" and "diamond" on the other two "cards" were enhanced with a red bling.  This darling image called "Pair of Aces" is from Whipper Snapper.  I colored with Copic Markers to coordinate with the Graphic 45 DSP, added a ribbon bow to the bow on the lady's bow alond with the Martha Stewart glitter backless brad on her heart.  The ace of spades received a clear button with a twine bow over the largest spade. The image was layered over the playing cards with dimensionals. I decided to stick with the neutral theme of the Graphic 45 papers and add just a pop of color with the red ribbon, bling and a red cardstock panel. I think I managed to meet all the requirements of the challenge.  What do you think?

    Please check out the other Divas starting with our leader Kelly here:
    http://www.sandcastlestamper.blogspot.com/
    Barb: http://inkingintoretirement.blogspot.com/
    Carol:  http://lostinmycraftroom.blogspot.com/
    Jamie: http://butterflystamper71.blogspot.com/
    LJ: http://buckygirl.blogspot.com/
    Tami: http://blueinksdesign.blogspot.com/

    Then check out the Dazzlers starting with their leader Jeanette here:
    http://creativeplayischeaperthantherapy.blogspot.com/

    Thanks for stopping by!

    Saturday, July 14, 2012

    Grilling with the Duelng Darlings!

    It's the 15th of the month and time for another duel with the Dueling Darlings.  Team leaders Darlene for the Dazzlers and Tami for the Divas chose "Grilling" as the theme for July.  I'm on the Diva team and love the card kit Tami sent us.  It included this super cute stamped image by Whipper Snapper called "Grill Sergeant".  Along with this image she had some terrific designer papers, ribbon, eyelets, rhinestones and die cuts.  I love that she also included some netting recyled from produce items.  Here's my take on the card kit:

    Designer Paper
    Red Check by My Mind's Eye Dilly Dally 'Best'
    Picnic by Karen Foster Design, 'Life's a Picnic'
    Red ribbon by Offray

    Materials not included in the kit are
    Cardstock:
    brown: Gina K Designs
    red: Bazzill's "Red Devil"
    green:  Stampin' Up "Gumball Green" and "Kiwi Kiss"
    Square rhinestones from Stampin' Up
    Images were colored with Copic markers

    My layout is based on this sketch from Mojo Monday 249:
    :

    Part of the challenge this month was to include a favorite grilling or picnic recipe.  My husband is the grill master in my family and here is a favorite recipe he's done many times:


    Garlic-Mustard Marinated Flank Steak
    (from Paul Kirk's Championship Barbecue)
    Serves 6 to 8

    Garlic-Mustard Marinade
    1/2 cup soy sauce
    1/4 cup red wine vinegar
    1/4 cup olive oil
    2 tablespoons granulated cane sugar
    2 tablespoons Worcestershire sauce
    2 tablespoons minced green onions (white and green parts)
    1 teaspoon freshly ground black pepper
    1 teasppoon minced fresh parsley leaves

    two 1 1/2 pound flank steaks, trimmed of any fat

    1.  To make the marinade, combine the marinade ingredients in a medium-size nonreactive bowl until well blended.  place the flank steaks in a shallow nonreactive baking dish or a zippered-top plastic bag.  Pour the marinade over the meat, making sure they're covered.  Cover with plastic wrap or seal and let marinate in the refrigerator for at least 4 to 6 hours or overnight.

    2.  Prepare a medium-hot fire in your grill.

    3.  Remove the steaks from the marinade, discarding the marinade.  Place the steaks directly over the coals, cover, and grill to your desired degree of doneness, 6 to 8 minutes per side for medium rare.

    4.  Let rest for 5 minutes.  To serve, slice thinly across the grain on a 60-degree bias.

    DELISH!

    Please go a check out my Diva's teammates contributions to this duel here:

    And check out the Dazzlers' contributions starting here:


    Tuesday, July 10, 2012

    A Wiper Card for a Swap and for a Birthday Boy!

    I belong to a fabulous group of card creators on Splitcoaststampers (SCS) called Sisterhood of the Traveling Cards.  Each month a different "Sistah" hosts the swap, selects the theme and card swap requirements.  This month my Sistah Barb challenged us to create cards using a unique fold.  I love creating cards with unique folds and or techniques.  Usually for a challenge like this I would try to create a card using a fold or technique I had never tried before.  Unfortunately, the timing was not condusive to putting the time and effort in creating something new so I went with an old standby that I've used before and that was the wiper card.  (You can find the tutorial for a wiper card on SCS here:
    http://www.splitcoaststampers.com/resources/tutorials/wipercard/)

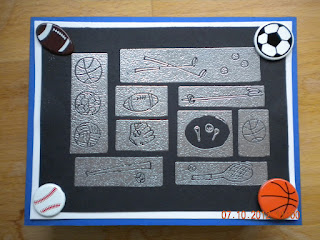
    For weeks prior to the deadline for this card I was preparing for a several month stay in Washington state for the summer.  Part of my preparations was to complete cards or have all the elements prepared for completion of card for multiple card swaps, birthdays and anniversaries that were to occur during our stay in WA.  My grand-nephew has a birthday in July so I decided in his honor to use a sports theme for my wiper card.  This was a big winner for me cuz I got to "kill two birds with one stone".  Hee Hee!
    Here is the card closed:

    Here is the card open:

      This image featuring multiple sporting equipment was embossed with silver embossing powder on black cardstock which was then layered on glossy white cardstock and attached to the blue wiper card front.  Football, soccer ball, basketball and baseball brads were attached at each corner.  I used some designer paper with letters spelling "sports" on the smaller side panels.  The wiper portion of the card has the sentiment "Have An All-Star Birthday!" on white with a black panel.

    I hope my nephew and my SCS Sistahs enjoy receiving this card.

    Friday, June 15, 2012

    We're Dueling for the Guys!

    It's the 15th of the month and because June is the month to celebrate the father's in our lives April, for the Dazzlers, and Jamie, for the Divas, have chosen a masculine theme for the June Dueling Darling challenge.  I'm on team Divas and received this oh so masculine card kit from Jamie.  The kit included:
    Both brown and blue DSP from Bo Bunny
    Brown textured paper
    Both Crumb Cake and Night of Navy c/s from SU (for our card bases)
    Miscellaneous brads
    Library clip from SU
    Naturals Designer buttons from SU
    EArly Espresso Baker's Twine from SU
    Denim ribbon from SU
    Both Chocolate Chip and Night of Navy 1/4" grosgrain ribbon from SU
    Sentinment in both Chocolate Chip and Night of Navy from My Sentiments Exactly
    Images also in both Chosclate Chip and Night of Navy from SU's "Open Sea"

    Thanks Jamie for a perfect masculine themed kit!!  I have lots left over for future creations!

    Here's my card:
    I chose to do a monochromatic color scheme using Night of Navy elements from the card kit.
    I die cut the images and sentiment using Nestability dies.
    The dsp was attached to a strip of white cardstock,wrapped with the denim ribbon and corners were enhanced with the silver brads.


    I haven't had my earthly father with me for 9 years now.  He was a true guide and no one could have a more loving and generous father and grandfather as he was.  I really, really miss him but know after his suffering declining health in the last 3 years of his life he is with our heavenly father and enjoying a peace, love and joy we can only hope for on this earth.

    My own dear husband is on his way to have a fun time with our youngest son fishing in the much cooler temps in the White Mountains of SE Arizona.  They'll be coming home on Sunday and I'm going to slip this card to my son so he can give it to his dad.

    Please go a check out my Diva's teammates contributions to this duel here:

    Kelly: http://sandcastlestamper.blogspot.com/
    Carol: http://lostinmycraftroom.blogspot.com/
    Barb: http://inkingintoretirement.blogspot.com/
    Jamie: http://www.butterflystamper71.blogspot.com/
    LJ: http://www.buckygirl.blogspot.com/
    Tami: http://blueinksdesign.blogspot.com/

    And also visit the Dazzlers starting with their leader Jeanette here:

    Hope you all have a wonderful weekend with the special guys in your life!  Thanks for stopping by!!

    Friday, June 8, 2012

    Triple Tiered Easel Card for a Favorite Aunt

    This past Monday's challenge on Splitcoaststampers' Try A New Technique was called "Either/Or but Both is More".  The challenge was to create a Triple Tiered Easel card and/or a card using the "See Through Image" technique as described here: http://www.splitcoaststampers.com/forums/try-new-technique-f44/tlc380-~-either-but-both-more-~-%7B06-04-12%7D-t555221.html.
    It was a real challenge to create the Triple Tiered Easel card as the examples and instructions shown were a little difficult for me to follow.  The "See Through Image" instructions and examples were a little easier.  I attempted to do both challenges in this birthday card I created for a dear aunt who will be celebrating her 88th birthday next month:

    This is the card in a closed position
    
    This is the top layer when closed and will be the third tier when in the easel position.
    I used Vellum for the top layer with a computer printed sentiment. I made the flowers and leaves from several flower punches and the butterflies from a Martha Stewart punch.
    This is the layer in the second tier when in the easel position.
    Top layer is vellum with computer created sentiment embellished with a blingy swirl and butterflies.
    I created the large butterfly and leaf by stamping the image on acetate and using glue and glitter on the opposite side.
    This shows all three tiers in the easel postions. 
    The top layer of the third tier is cut using the "See Through Image" technique. 
    I used Stampin' Up's Flower of the Month stamp for July and a circle Nestability die.
    The image was colored with Copic Markers.
    Card base and tiers were created with Scalloped Circle Nestability dies.
    Paper:  SU  Taken With Teal, gold metallic, s.e.i. Field Notes collection, glitter cardstock

    Side Views
    Top View

    Thanks for stopping by!  I would love to hear what you think of my Triple Tier Easel card.